Laser engraved glass bottles are a unique and elegant gift option for weddings and other special occasions. Laser engraving allows for intricate designs to be etched onto glass, adding a personal touch to each bottle. Ready to create your own custom keepsakes? Follow our step-by-step guide to learn how to craft stunning laser engraved glass bottles—from selecting the right glass and preparing your design to setting up the laser engraver, engraving the bottle, and adding those perfect finishing touches.
Step 1: Choose the Perfect Glassware

Selecting the right glassware is crucial for creating stunning laser engraved bottles. Consider the shape and size that best suits your design and purpose. Wine bottles, champagne bottles, and small glass jars with lids are popular options for weddings and souvenirs. Ensure that the glassware is of high quality, with smooth surfaces free from blemishes or defects.
Step 2: Prepare and Optimize Your Design

Before engraving the glass bottle, create or acquire the design you want to use. Use specialized software like Adobe Illustrator to design or customize pre-made designs. Consider the bottle's shape and size, ensuring the design fits perfectly. Test the design on a clear glass surface to check its appearance and adjust as needed. Save the design as a .pdf, .jpeg, or .png file for uploading to the laser engraving machine.
Step 3: Set Up the Laser Engraver

Prepare the laser engraver for the engraving process. Turn on the machine and calibrate the laser and mirror alignments. Upload the design to the software and position the glass bottle securely on the engraved bed. Use a rotary attachment if desired for a spinning effect during engraving.
Step 4: Conduct a Test Run

Before engraving the actual glass bottle, perform a test run on a separate glass surface. This allows you to fine-tune the settings and ensure the correct areas are cut or engraved. Iterate this step until you achieve the desired outcome.
Step 5: Engrave the Glass Bottle

With the laser engraver calibrated and the design finalized, begin the engraving process. Pay close attention to the process, ensuring the bottle remains secure and stable. The laser will etch the design onto the glass bottle in just a few minutes.
Step 6: Clean and Finish the Glass Bottle
After the engraving is complete, the glass bottle may have a white residue known as "haze." Remove this haze by gently wiping the bottle with a paper towel and rubbing alcohol. Take care not to rub too hard and damage the design.
Step 7: Add Personalized Finishing Touches
To enhance the appearance of the engraved glass bottle, consider adding personalized finishing touches. Tie a ribbon, attach a custom tag, or include a decorative sticker that aligns with the event or occasion. These extra details will make the gift even more special.
Introducing the Monport GI30 Integrated MOPA Fiber Laser Engraver & Marking Machine with Electric Lifting
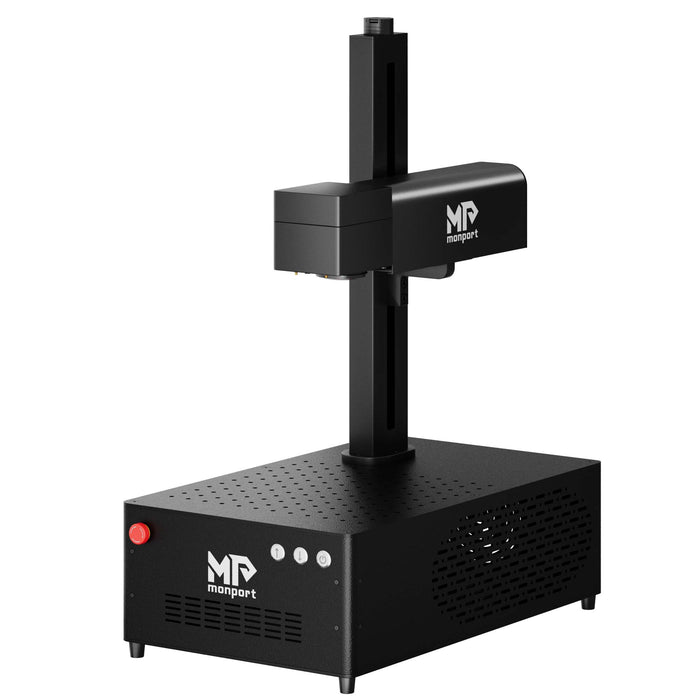

This state-of-the-art laser engraver from Monport offers unparalleled speed, precision, and flexibility for your design journey.
Key Features:
- Full color marking: With adjustable pulse frequency and width, this laser engraver enables vibrant color marking on stainless steel and high contrast engraving on anodized aluminum.
- Integrated Innovative Design: The GI30 is designed to be lighter, smaller, and more user-friendly, while maintaining exceptional performance.
- Electric Lifting Focus: The integrated concealed lifting motor ensures spot-on focusing, making precision engraving effortless.
- LightBurn Compatible: The GI30 is fully compatible with LightBurn software, providing a seamless marking experience with user-friendly controls and customizable features.
- Industry-leading Heat Dissipation Technology: Built-in air cooling and unique side panel openings ensure efficient heat dissipation, allowing the machine to maintain peak performance.
- Thoughtful Details: The machine features an anodized aluminum oxide casing for durability and aesthetic appeal. All sharp parts have been chamfered or filleted for user safety. Dust shields at the back of the work area increase the machine's lifespan.
The Monport GI30 is equipped with a 30W JPT MOPA fiber laser and delivers precise cuts of up to 0.05mm per pass, with accuracy to ±0.1 micron. It boasts an MTTF exceeding 100,000 hours, ensuring long-lasting performance.
Conclusion
Creating laser engraved glass bottles for weddings and souvenirs is a creative and personalized way to add elegance to your special event. By carefully selecting glassware, optimizing your design, setting up the laser engraver correctly, and following the engraving process, you can achieve stunning results. Don't forget to add those final personalized touches to make the bottle truly unique. With this step-by-step guide, you are ready to embark on your laser engraving journey and impress your guests with these beautifully customized glass bottles.
To get started on your creative process, the GI30 comes with an included rich material pack. Whether you're a beginner or experienced user, this fiber laser engraver has the features and capabilities to transform your designs into stunning reality. Visit Monport today for more!