

Introduction
Laser engraving/cutting will accumulate residues during normal laser processing.
When using dirty materials, a large amount of smoke will be generated, and the lens will get dirty faster. When a high powered laser is used with a dirty lens, the lens generates heat and destroys it.
One of the best ways to maintain the best performance of the laser engraving machine is to clean the optical elements (mirrors and lenses) once a week. Smoke, resin, and other contaminants can accumulate inside mirrors and lenses, which not only reduces the available power of the high powered laser, but also may damage the optical components.


Why should we clean the laser mirrors and focus lens?
The laser tube can emit a parallel beam of one wavelength. With the help of a mirror, the high powered laser beam can be controlled. For CO2 lasers, the laser beam is located in the infrared range that cannot be seen by human eyes. Usually, a small red light will be emitted in the same path as the high powered laser beam to show the trajectory of the laser. Using a laser cutting machine, a small part of the material can be heated in a very short time, resulting in local melting, combustion, or evaporation of the material. In this way, the material can be cut or engraved accurately.
The high powered laser beam generated by the tube is reflected by three mirrors and focused through an optical lens before contacting the material. The purpose of laser alignment is to ensure that the high powered laser beam path is correctly centered from the laser tube to the outlet of the laser head nozzle.

What makes the laser mirrors and focus lens dirty?
Surface contamination can be divided into three categories:
- Pollution in the laser process, i.e. burning in the particles splashed on the back.
- Dust, grease and contamination by air-borne particles.
- Human / biological stains caused by talking, coughing or sneezing near the exposed surface.
When cutting wood or acrylic, the material under the laser beam will evaporate. It is then condensed into smoke, ideally extracted from the laser by a ventilation fan. However, even with the best ventilation, smoke will spread around the laser machine, and over time, particles will adhere to all surfaces, including mirrors and lenses. During carving, some materials are evaporated, but some are burned or charred, which will produce more smoke and aggravate the problem.
When the laser is working, air is supplied to the nozzle and a positive pressure should be generated inside it so that the air is squeezed out of the nozzle along the laser beam. When cutting or engraving material, the air flow shall prevent debris from the cut (cutting area) from re entering the nozzle. However, this is not 100% perfect. Over time, smoke or debris will be sucked back into the nozzle and contaminate the lower surface of the lens.
It should also be noted that when aiming at the mirror and laser head, the use of tape on the mirror or laser head may cause the mirror to be polluted or leave smoke residue on the upper surface of the lens.Regular cleaning of mirrors and lenses is essential. It is also important to keep your work environment clean and remove excess dust around the room. At the end of each work, we implement a simple on-site cleaning procedure and conduct deep cleaning once a week.

How to clean focus lens for laser engraving machine?
The laser lens is divided into focus lens, lens protection and other types. It is inevitable that it will be polluted in the working process, such as water pollution and dust pollution. Therefore, the laser lens needs to be cleaned in the process of daily maintenance to ensure the stability of the laser cutting machine.
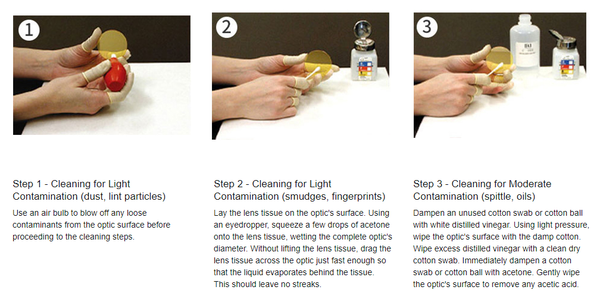
Cleaning lenses is certainly not like cleaning lenses in our life. We need to pay special attention to the correct method of cleaning laser lenses in the laser cutting machine introduced in this paper. In the process of cleaning the lens, the only purpose is to remove the pollutants on the lens and will not cause further pollution and damage to the lens. In order to achieve this goal, people tend to adopt relatively low-risk methods. Firstly, it is necessary to use air bulb to purge the small particles and colloidal flocs floating on the surface of components, especially on the surface of lens. However, do not use compressed air, because the air will contain oil and water droplets, which will deepen the pollution of the lens.
The second step is to apply acetone on the lens for slight cleaning. This concentration of acetone is almost anhydrous, which reduces the possibility of lens contamination. Cotton balls dipped in acetone must be cleaned in the light of the lens and moved in a circular motion. Once soiled, the cotton swab must be replaced. Cleaning should be carried out to avoid generating wavy strips at one time. (if the lens has two coated surfaces, such as the lens, each surface needs to be cleaned in this way. The first surface needs to be placed on a piece of clean paper to protect it.)
Note: only check-in sticks and cotton swabs can be used. It is picked only by using high-quality medical cotton and does not contain any abrasive. Of course, some pollutants and lens damage cannot be removed by cleaning, especially the metal splash and dirt caused by film burn. The only way to restore good performance is to replace the lens. During installation, if the method is incorrect, the lens will be polluted. Therefore, the operating procedures should be followed. In addition, if the lens is not installed correctly, the laser system will not work properly and may even be damaged. All CO2 laser lenses shall be installed in a specific direction. Therefore, the user should make sure that the direction of the lens is correct.

How to clean laser mirrors?
Mirror is the third common lens, and its installation is also very critical. Obviously, the coating faces the laser. In general, the manufacturer will mark the edge to help identify the surface. Generally speaking, this symbol is an arrow, an arrow pointing to the side. Each lens manufacturer has a system marked by the lens. Generally speaking, the arrow is opposite to the rear-view mirror and the output rear-view mirror. For lenses, the front of the arrow is concave or flat. Sometimes, the label of the lens will remind the meaning of the mark. If the lens is properly cleaned and operated, its service life and performance will undoubtedly be improved, which is also one of the important ways to improve the service life and stability of laser cutting machine. Some preventive and maintenance measures will ensure that the laser cutting machine works longer and more stably.

To clean the 3 mirrors, make sure there is sufficient access to the mirrors through the access door and again make sure that the laser is turned off when performing the cleaning operation. We also recommend wearing clean cotton or latex gloves to prevent fingerprints and protect the skin. You need a rearview mirror removal tool, or if you are careful, you can use a pair of circlip pliers. The mirror is held in place by a threaded ring that can be unscrewed by inserting the tip of a tool or pliers into the two holes on the back of the mirror support and turning counterclockwise. It is very important not to put too much pressure on your rear-view mirror because it is not intended to damage the performance of your laser mirror. After unscrewing the retaining ring, take a strip of adhesive tape and gently place it on the back of the rearview mirror. This will allow you to easily remove the mirror from its bracket. All 3 mirrors can be removed in this way for deep cleaning. After removing each mirror, you need to check each mirror for scratches, soot or debris.
- Hold the mirror so that the reflecting surface faces up and do not touch the reflecting surface of the mirror (do not apply any finger pressure or any other cleaning solution to the mirror surface).
- Put a new lens tissue on the mirror.
- Cover the mirror with a few drops of cleaning solution (just enough paper towel to cover the mirror surface).
- Pull the tissue across the mirror in one direction.
- Make sure the mirror is completely dry before reinstallation.

Unlock Flawless Metal Marking with Monport Black Laser Marking Spray
When it comes to creating professional-grade metal engravings, Monport black laser marking spray is a must-have for makers, hobbyists, and professionals alike. This powerful aerosol spray is specially formulated to work with CO2 laser machines of 25 watts and above, producing permanent black markings with exceptional contrast. Whether you're working on stainless steel, brass, or aluminum, the black laser marking spray bonds effortlessly to the surface, allowing for detailed and precise designs. Its fine-particle formula and anti-clog nozzle ensure smooth, even coverage every time. Drying in just five minutes, the black laser marking spray is easy to use and leaves no sticky residue after rinsing. From customizing jewelry to labeling tools or decorating metalware, the black laser marking spray from Monport delivers clean, bold results that last.
Conclusion: Clean laser mirrors and focus lens
Perfect engraving and cutting results require perfectly clean optics, especially when using wood or rubber that produces more dust than other applications. In order to ensure the quality of laser engraving or cutting, the lenses and mirrors should be checked and cleaned regularly. The laser beam needs to be generated correctly in the tube before it can bounce accurately on three completely clean laser mirrors and then pass through a completely clean laser focusing lens. If any aspect of the optical system is not perfect, the laser will not be able to cut with 100% efficiency. The cleanliness of mirrors and lenses will not only affect the beam quality, but also the accumulation of pollutants will lead to the rapid failure of components, resulting in the cost and inconvenience of replacing components.
Each time you use the laser machine, be sure to perform the quick cleaning procedure with a pre moistened lens wipes, at least once. In addition, deep cleaning and inspection should be part of the regular maintenance plan. These preventive maintenance steps will extend the service life of the laser mirror and focus lens and ensure that the laser always operates at the best efficiency.


