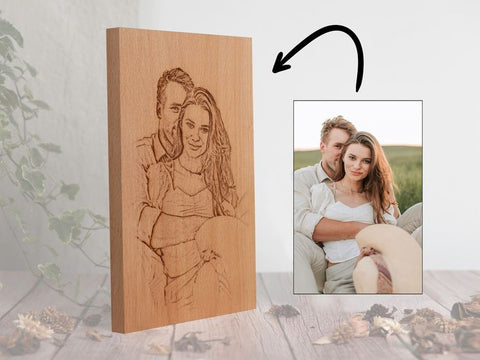
The knowledge of how to transfer design to wood unlocks a world of possibilities, allowing you to personalize wood surfaces with pictures, patterns, or text. Wood, a timeless and versatile material, offers a beautiful canvas for creative expression. Whether you're a seasoned crafter or just starting your DIY journey, this guide explores various techniques for putting pictures on wood.
We'll delve into the pros and cons of each method, equip you with step-by-step instructions for putting pictures on wood, and explore the powerful potential of the Monport 40W Desktop CO2 Laser Engraver for precise and permanent design transfers. Free laser cutting files are an excellent resource for experimenting with designs and achieving professional results.
Monport 40W Lightburn-ready (12" X 8") CO2 Laser Engraver & Cutter with FDA Approval
Popular Techniques of How to Transfer Design to Wood:
There are several effective methods on how to transfer design to wood. Choosing the right technique depends on factors like the complexity of the design, desired finish, and available tools. Here's a breakdown of some popular options:
1. Iron-On Transfer Paper:
- Pros: Easy to use, readily available, suitable for beginners.
- Cons: Limited to designs printed on special transfer paper, may not create a permanent bond or achieve high detail on intricate designs.
2. Mod Podge Transfer:
- Pros: Affordable, readily available materials, allows for some creative freedom with paint and finishes.
- Cons: Requires multiple steps, can be messy, may not be suitable for all types of wood or detailed designs.
3. Laser Transfer Paper:
- Pros: Creates crisp and detailed transfers, allows for intricate designs, good option for photo transfers.
- Cons: Requires a laser printer and compatible laser transfer paper, can be more expensive than other methods.
4. Laser Engraving with a CO2 Laser Engraver:

- Pros: Creates permanent, high-quality engravings, allows for precise details and fine lines, versatile for various wood types and designs.
- Cons: Requires a CO2 laser engraver, proper ventilation is crucial for safety.
The Power of CO2 Laser Engravers for Design Transfer
While iron-on transfer paper and other methods offer a starting point, CO2 laser engravers like the Monport 40W Desktop CO2 Laser Engraver provide a powerful and versatile solution for permanent and high-quality design transfer on wood. Free laser cutting files can be a great way to test the capabilities of your CO2 laser engraver.
Benefits of Using a CO2 Laser Engraver:
-
Precision and Detail: CO2 laser engravers achieve exceptional detail and crisp lines, faithfully reproducing intricate designs and photo images onto wood. Many free laser cutting files are optimized for this precision.
-
Permanence: The laser engraving process creates a permanent mark on the wood surface, resulting in a durable and long-lasting design.
-
Versatility: CO2 laser engravers can work with various wood types and thicknesses, allowing you to personalize a wide range of wood craft projects. Access to free laser cutting files can further expand your creative options.
The Monport 40W Desktop CO2 Laser Engraver: Your Design Transfer Partner
The Monport 40W Desktop CO2 Laser Engraver is a user-friendly and powerful option on learning how to transfer design to wood. Here's a closer look at its features:
-
Exceptional Speed and Precision: This machine boasts engraving speeds of up to 13.8 inches per second (350mm/s) and delivers an engraving accuracy of 0.01 inches, ensuring high-quality results for all your projects, from simple text engravings to intricate photo transfers. Free laser cutting files can help you achieve intricate designs easily.
-
Lightburn Compatibility: The Monport 40W comes equipped with an upgraded control board for seamless compatibility with Lightburn software. Lightburn is a powerful and intuitive design software widely used in the laser engraving industry, allowing you to import and edit images for precise laser transfers, including free laser cutting files.
-
Red Dot Guidance: A built-in red dot guidance system mounted on the laser head precisely illustrates the laser's path, eliminating guesswork and ensuring perfect alignment for every design element.
-
Safe and Efficient Design Transfer: The Monport 40W Desktop CO2 Laser Engraver prioritizes safety with features like an integrated ventilation system and exhaust port. This helps remove fumes and dust particles created during the laser engraving process, maintaining a clean and safe work environment.
Step-by-Step Guide: Putting Pictures on Wood Using the Monport 40W CO2 Laser Engraver
The Monport 40W CO2 Laser Engraver offers a powerful and precise method for permanently putting pictures on wood. This guide will walk you through the process, ensuring a successful and safe design transfer experience.
Materials:
- Monport 40W CO2 Laser Engraver
- Lightburn software (or compatible design software)
- Your chosen picture in a digital format (preferably high-resolution for best results)
- Wood substrate (ensure it's suitable for laser engraving)
- Masking tape (optional)
- Sandpaper (optional)
- Rag or compressed air (for cleaning)
- Safety glasses (designed for CO2 laser use)
Software Preparation:

-
-
Import your picture: Open Lightburn software (or your chosen design software) and import the picture you want to transfer onto the wood. You can also experiment with free laser cutting files for practice.
-
Image adjustments (optional): You may want to adjust the image for optimal laser engraving. Lightburn offers tools for adjusting brightness, contrast, and even converting the image to grayscale for a more laser-friendly format. Consult your software's user guide for specific instructions.
-
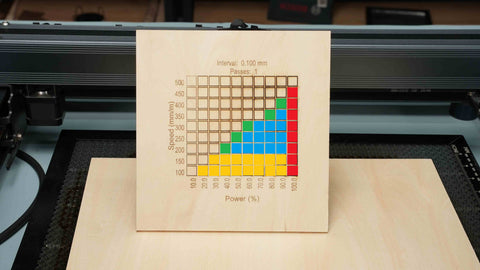
Set engraving parameters: Refer to the user manual for your specific Monport 40W CO2 Laser Engraver model to determine the appropriate engraving settings for your chosen wood type and desired engraving depth. Lightburn typically allows you to set power, speed, and number of passes for the laser engraving process.
-
Hardware Preparation:
- Prepare your wood surface: Ensure the wood surface is clean, free of dust, debris, or any finishes that might react negatively to the laser beam. Sanding the surface with fine-grit sandpaper can help achieve a more even engraving result (optional).
- Secure the wood: Place the wood securely onto the workbed of the Monport 40W CO2 Laser Engraver. You can use masking tape to hold the wood down if necessary.
Laser Engraving Process:
- Safety First: Before starting the engraving process, ensure you are wearing CO2 laser safety glasses. Never operate the laser engraver without proper eye protection.
- Test run (optional): Consider doing a small test engraving on a scrap piece of wood with your chosen settings to ensure optimal results before engraving your final design on the main wood piece.
- Send the job to the laser: Once you're satisfied with your design and settings in Lightburn, send the job to the laser engraver. The laser will then precisely scan the image and engrave it onto the wood surface.
Post-Engraving:
- Let it cool: Allow the engraved wood to cool completely before handling it.
- Cleaning: Gently remove any dust or debris from the engraved area using a soft rag or compressed air.
- Finishing touches (optional): Depending on your desired outcome, you can apply a wood stain, paint, or sealant to the engraved wood for an added touch of personalization or protection.
Additional Tips:
- Start with simpler images for your initial projects and gradually progress to more complex designs as you gain experience with laser engraving.
- The Monport 40W CO2 Laser Engraver offers a red dot guidance system to help visualize the laser path. Use this feature to ensure precise alignment of your design on the wood before engraving.
- Always consult the user manual for your specific Monport 40W CO2 Laser Engraver model for detailed safety instructions and operational guidance.
By following these steps and prioritizing safety, you can utilize the Monport 40W CO2 Laser Engraver to transform wood into beautiful and personalized pieces adorned with your chosen pictures. The level of detail and precision achievable with laser engraving opens a world of creative possibilities for woodworking projects, photo keepsakes, and unique home decor items. Happy engraving!
Safety Considerations When Using a CO2 Laser Engraver
While CO2 laser engravers offer exceptional design transfer capabilities, safety is paramount. Here are some essential safety practices to remember:
- Always wear proper safety glasses designed for CO2 laser use to protect your eyes from the laser beam.
- Never leave the laser engraver unattended while in operation.
- Maintain proper ventilation by ensuring the exhaust system is turned on before starting the laser and remains operational throughout the engraving process.
- Keep your workspace clean and organized to minimize dust and debris accumulation, which can be a fire hazard.
- Familiarize yourself with the user manual and safety instructions for your specific CO2 laser engraver model.
Frequently Asked Questions (FAQ): Monport 40W CO2 Laser Engraver
While the blog post focused on design transfer and project ideas, this FAQ section dives deeper into some frequently asked questions regarding the Monport 40W CO2 Laser Engraver, covering topics like parameters and settings, maintenance, and troubleshooting.
Parameters and Settings:

-
Q: How do I determine the correct laser engraving parameters for my project? A: The optimal settings for laser engraving depend on several factors, including the type of material you're using (wood, acrylic, etc.), the desired engraving depth, and the thickness of the material. It's recommended to consult the user manual for your Monport 40W CO2 Laser Engraver model, which will provide a starting point for various materials. You can then fine-tune the settings (power, speed, number of passes) based on your specific project and desired outcome. Experimenting on scrap materials is always a good practice before engraving on your final piece.
-
Q: Does the Monport 40W CO2 Laser Engraver come with pre-set settings for different materials? A: Some Monport 40W CO2 Laser Engraver models may come with pre-set settings for common materials. However, it's still important to consult the user manual and potentially experiment with these settings to achieve the best results for your specific project. Wood variations, for instance, can require slight adjustments even within the same wood type category.
Maintenance:
-
Q: How do I maintain my Monport 40W CO2 Laser Engraver? A: Regular maintenance is crucial for ensuring optimal performance and longevity of your laser engraver. Here are some key maintenance tips:
- Cleaning: Regularly clean the laser lens and mirrors using compressed air or a soft, lint-free cloth. Avoid touching the lens or mirrors with your bare hands, as oils from your skin can damage the delicate surfaces.
- Water System (if applicable): Some models incorporate a water cooling system. Ensure the water level remains within the recommended range and replace the water periodically according to the user manual's instructions.
- Exhaust System: Maintain a clean exhaust system to ensure proper ventilation and fume removal during laser engraving. Regularly check and clean the exhaust fan and filter.
-
Q: How often should I perform maintenance on my Monport 40W CO2 Laser Engraver? A: The frequency of maintenance will depend on how often you use your laser engraver. Consulting the user manual for your specific model is recommended, but a general recommendation is to clean the lens and mirrors after every 40 hours of operation, and perform a more comprehensive cleaning, including the exhaust system, every 200 hours of operation.
Troubleshooting:
-
Q: My laser beam doesn't seem to be cutting/engraving deeply enough. What could be wrong? A: There could be several reasons for this. First, ensure your laser parameters (power, speed, number of passes) are set appropriately for the material and desired engraving depth. Second, check the laser lens and mirrors for any dirt or debris that might be affecting the laser beam's strength. Consult the user manual for troubleshooting steps specific to your model.
-
Q: I'm encountering error messages on my Monport 40W CO2 Laser Engraver. What should I do? A: The user manual for your specific model should have a troubleshooting section that explains error codes and recommended solutions. If you're unable to resolve the issue yourself, contact Monport's customer support for further assistance.
Remember, this FAQ is not a substitute for the user manual that comes with your Monport 40W CO2 Laser Engraver. Always refer to the user manual for detailed instructions, safety precautions, and troubleshooting steps specific to your model. By following these guidelines and maintaining your laser engraver properly, you can ensure its optimal performance and enjoy successful creative projects for years to come.

Conclusion: Bringing Your Woodworking Dreams to Life
With the right technique and potentially the power of a CO2 laser engraver, you can transform wood into beautiful and personalized creations. This guide has equipped you with various methods for transferring designs to wood, from beginner-friendly iron-on transfers to the exceptional detail and permanence offered by CO2 laser engraving. When considering a CO2 laser engraver, the Monport 40W Desktop CO2 Laser Engraver is an excellent choice for its user-friendly design, powerful features, and commitment to safety.
Remember, safety is always a priority. By following these guidelines and prioritizing safe practices, you can unlock the exciting world of design transfer on wood and transform your woodworking projects into stunning and lasting pieces. So, unleash your creativity, explore the possibilities, and get ready to put a picture on wood with confidence!


