

When it comes to laser engraving, the Monport 40W Laser stands out as an exceptional choice for hobbyists and professionals alike. Known for its high precision, speed, and seamless Lightburn compatibility, this laser engraver offers a versatile solution for various engraving projects. Whether you're working with wood, acrylic, leather, or glass, the Monport 40W Laser delivers flawless results. In this guide, we’ll walk you through the process of setting up the Monport 40W Laser with Lightburn, ensuring you can get started with ease and maximize your engraving potential.

Monport 40W Pro Lightburn-Supported (12" X 8") CO2 Laser Engraver & Cutter with Air Assist

Why Choose the Monport 40W Laser?
The Monport 40W Laser is a CO2 laser engraver and cutter equipped with an advanced 40W power laser tube, ideal for handling a wide range of materials. One of its standout features is its compatibility with Lightburn software, making it the perfect tool for those seeking precision and control in their engraving projects. Here's why it’s a top choice for creators and small business owners:

- High Precision and Speed: With engraving speeds of up to 350mm/s and an engraving accuracy of 0.01 inches, this laser machine delivers crisp, detailed designs.
- Lightburn Compatibility: The Monport 40W Laser is specifically built to integrate seamlessly with Lightburn, providing you with limitless design possibilities.
- Built-In Air Assist: The built-in air assist reduces carbonization when engraving wood, ensuring clean and clear results every time.
- Dual Work Bed: The machine features an innovative dual work bed, offering more options for different project types.
- Improved Components: Equipped with a 19mm adjustable laser head, professional-grade metal rails, and high-quality mirror holders, this laser cutter is designed for precision and longevity.
Setting Up the Monport 40W Laser with Lightburn
Setting up the Monport 40W Laser with Lightburn is a straightforward process, but to make sure you maximize the potential of your machine, it’s essential to follow the steps carefully. Here’s a step-by-step guide on how to get started:
Step 1: Unboxing and Assembling the Monport 40W Laser
Upon receiving your Monport 40W Laser, carefully unbox the unit and follow the assembly instructions included in the manual. Ensure all parts, including the laser tube, power supply, laser head, and mirrors, are in place. The Monport 40W Laser comes with all the necessary components for assembly, so make sure everything is secure before powering on the machine.
Step 2: Install the Lightburn Software
Next, you need to install Lightburn on your computer. Lightburn is the go-to software for laser engraving, and it’s compatible with a range of laser engravers, including the Monport 40W Laser. To install Lightburn, visit their website, download the software for your operating system, and follow the installation instructions.
Once installed, open the software and ensure it’s ready for communication with your Monport 40W Laser.
Step 3: Connect Your Monport 40W Laser to the Computer
Connect your Monport 40W Laser to your computer using the provided USB cable. This connection allows Lightburn to communicate with the laser engraver, sending the designs you create directly to the machine. The connection should be secure, so ensure the cable is properly plugged in at both ends.
Step 4: Install the Monport 40W Laser Driver
To enable proper communication between your Monport 40W Laser and Lightburn, you need to install the necessary drivers. These drivers are usually provided with the laser or can be downloaded from the Monport website. Once the drivers are installed, restart your computer to ensure the settings take effect.
Step 5: Set Up Lightburn for Your Monport 40W Laser
Now that everything is connected, you need to configure Lightburn to work with your Monport 40W Laser. Open the software and select "Create a new device" in the Laser Devices tab. Choose “CO2 Laser” and then select your laser’s specific parameters, including the laser type, bed size (12"x8"), and communication settings. Lightburn will automatically detect your Monport 40W Laser once the driver is installed and the machine is powered on.
Step 6: Calibrate Your Monport 40W Laser
Before you start engraving, it's essential to calibrate your Monport 40W Laser to ensure accurate performance. Adjust the laser head and focus according to the material you intend to use. The Monport 40W Laser comes with a Red Dot Guidance system that helps you align the laser’s path with precision, ensuring you hit your target every time.
Step 7: Test Your Laser Engraver
Before diving into intricate projects, perform a test engraving on a scrap piece of material. This step will allow you to check the engraving quality, adjust the power settings, and verify the alignment. Lightburn offers a range of tools to fine-tune your laser’s power, speed, and resolution, allowing you to customize the settings for optimal results.
Step 8: Start Engraving and Cutting

With your Monport 40W Laser and Lightburn software properly set up, you’re ready to begin engraving and cutting. Simply import your design into Lightburn, position it on the virtual workspace, and send it to the laser. The Monport 40W Laser will handle the rest, delivering accurate and clean results, whether you’re working with wood, acrylic, leather, or another material.
Machine Settings for Different Materials
Below is a table outlining suggested settings for the Monport 40W Laser when engraving and cutting various materials. These settings may need adjustments based on your specific material and design requirements. Always test on a scrap piece first.
| Material | Engraving Speed (mm/s) | Engraving Power (%) | Cutting Speed (mm/s) | Cutting Power (%) | Notes |
|---|---|---|---|---|---|
| Wood | 300 | 30 | 10 | 80 | Use air assist to reduce burn marks. |
| Acrylic | 250 | 20 | 8 | 90 | Avoid engraving transparent acrylic without coating. |
| Leather | 300 | 25 | 15 | 70 | Ventilate well to remove odor. |
| Glass | 200 | 15 | N/A | N/A | Use a damp paper towel on the surface to prevent chipping. |
| Cardboard | 400 | 20 | 20 | 60 | Lower power to avoid scorching. |
| Fabric | 350 | 15 | 30 | 50 | Test on a small area; fabric types vary greatly. |
| Rubber | 250 | 30 | 12 | 80 | Use venting to minimize fumes. |
Troubleshooting Tips for the Monport 40W Laser
-
Laser Not Cutting or Engraving Properly
- Check the Focus: Ensure the laser head is properly focused on the material. Use the focus tool provided to adjust the laser distance.
- Inspect Mirrors and Lenses: Clean the mirrors and lenses to remove any dust or debris that could obstruct the laser beam.
- Check Power Settings: Ensure the power settings in Lightburn are appropriate for the material being used.
-
Laser Beam Misalignment
- Align the Mirrors: Use the alignment tools provided with the laser to adjust the mirrors for proper beam direction.
- Check Mounts: Ensure all mounts and screws are secure to prevent vibration and misalignment during operation.
-
Software Connection Issues
- Verify USB Connection: Ensure the USB cable is securely connected to both the machine and the computer.
- Check Drivers: Reinstall the Monport driver if the connection is not recognized.
- Restart Lightburn: Close and reopen Lightburn to reset the connection.
-
Excessive Smoke or Burn Marks
- Use Air Assist: Activate the built-in air assist to reduce smoke and discoloration.
- Adjust Power and Speed: Lower power and increase speed to minimize burning.
- Check Ventilation: Ensure proper ventilation by connecting the exhaust port to an outdoor vent.
-
Material Not Cutting Through
- Increase Power: Gradually increase the cutting power and slow down the speed.
- Multiple Passes: For thicker materials, try multiple passes instead of a single high-power pass.
Maintenance Tips for the Monport 40W Laser
-
Regular Cleaning
- Clean the Laser Lens and Mirrors: Use a soft, lint-free cloth and lens cleaner to remove dirt and residue from the lens and mirrors.
- Wipe Down the Work Bed: Remove debris and dust from the work bed after every session to ensure a clean workspace.
-
Check Alignment
- Regularly check and adjust the alignment of the laser mirrors to maintain optimal performance.
-
Inspect the Air Assist
- Ensure the air assist nozzle is free of blockages and functioning properly. Clean it if necessary.
-
Lubricate Moving Parts
- Apply a small amount of lubricant to the rails and bearings to ensure smooth movement of the laser head.
-
Ventilation System
- Clean the exhaust fan and ventilation system regularly to prevent buildup of fumes and ensure proper airflow.
-
Check the Laser Tube
- Inspect the laser tube periodically for any cracks or damage. Replace it if you notice a drop in power or beam quality.
-
Software Updates
- Keep your Lightburn software up-to-date to take advantage of the latest features and bug fixes.
By following these settings, troubleshooting steps, and maintenance tips, you can ensure your Monport 40W Laser operates efficiently and delivers outstanding results. Proper care will not only prolong the lifespan of your laser but also ensure consistent, high-quality engravings and cuts.
Maximizing Your Monport 40W Laser’s Potential
To get the most out of your Monport 40W Laser and Lightburn, here are some tips:
- Experiment with Settings: Test different power, speed, and resolution settings for various materials to achieve the best results.
- Use the Built-In Air Assist: Always use the air assist when engraving wood, as it helps reduce burning and discoloration.
- Keep Your Laser Clean: Regularly clean the laser lens, mirrors, and work bed to maintain performance and prevent residue buildup.
- Leverage Lightburn Features: Lightburn offers powerful features like layer management, path optimization, and engraving preview that can enhance your workflow and productivity.
Frequently Asked Questions (FAQ) about the Monport 40W Laser and Lightburn Setup
1. What is the Monport 40W Laser compatible with?
The Monport 40W Laser is compatible with Lightburn and Laser GRBL software, making it versatile for a wide range of design projects. Its seamless integration with Lightburn ensures precise control and advanced design capabilities.
2. How do I install Lightburn for the Monport 40W Laser?
To install Lightburn:
- Download the software from the official Lightburn website.
- Follow the installation instructions for your operating system.
- Set up the device within Lightburn by selecting the CO2 Laser option and configuring the bed size to 12"x8" (200mm x 300mm).
3. What materials can I engrave and cut with the Monport 40W Laser?

The Monport 40W Laser can handle a variety of materials, including:
- Engraving: Wood, acrylic, leather, glass, rubber, and fabric.
- Cutting: Wood, acrylic, leather, cardboard, and rubber.
4. Why is my laser not cutting through the material?
- Check that the laser is properly focused.
- Increase the power or decrease the speed in the settings.
- Perform multiple passes for thicker materials.
- Ensure the mirrors and lenses are clean and aligned.
5. What is the purpose of the built-in air assist?
The built-in air assist reduces carbonization and burn marks on materials, ensuring cleaner and more precise engraving and cutting results. It also helps remove debris from the laser path during operation.
6. How do I maintain the Monport 40W Laser for optimal performance?

- Clean the lens, mirrors, and work bed regularly.
- Check the alignment of the laser mirrors periodically.
- Keep the air assist and ventilation system free of blockages.
- Lubricate the rails and bearings for smooth movement.
7. What safety precautions should I take when using the Monport 40W Laser?
- Always wear laser safety goggles to protect your eyes.
- Use proper ventilation to remove fumes generated during engraving or cutting.
- Avoid leaving the laser unattended during operation.
- Ensure the machine is placed on a stable surface away from flammable materials.
8. How can I fix connection issues between the Monport 40W Laser and Lightburn?
- Ensure the USB cable is securely connected.
- Reinstall the driver for the Monport 40W Laser.
- Restart your computer and Lightburn.
- Check for software updates for both Lightburn and your operating system.
9. Can I engrave transparent acrylic with the Monport 40W Laser?
Yes, but you’ll need to coat the transparent acrylic with a non-reflective material (e.g., a matte spray or masking tape) to allow the laser to effectively engrave the surface.
10. Where can I find replacement parts for the Monport 40W Laser?
Replacement parts, such as laser tubes, lenses, mirrors, and air assist components, can be purchased directly from the Monport website or authorized retailers. Always ensure compatibility with your specific model.
Elevate Your Engraving with Monport Black Laser Marking Spray
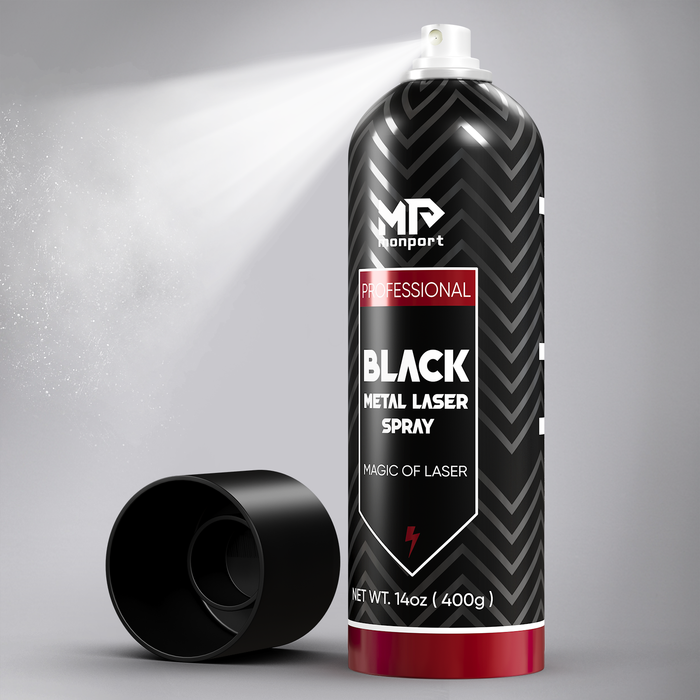
Monport black laser marking spray is an essential tool for those looking to create permanent, high-contrast markings on a variety of metals, including aluminum, stainless steel, and brass. Ideal for use with CO2 laser engraving machines of 25 watts and above, this black laser marking spray ensures deep, durable marks that withstand the test of time. With its advanced nozzle technology, the spray is applied evenly, allowing for a smooth, professional finish every time. The quick-dry formula of this black laser marking spray helps streamline your workflow by drying in just five minutes, enabling faster production. After engraving, simply rinse the surface to reveal the sharp, dark markings created by the black laser marking spray, making it perfect for a wide range of applications from custom jewelry to industrial tool marking.
Conclusion
Setting up the Monport 40W Laser with Lightburn is a simple and straightforward process, but it opens up a world of possibilities for high-quality engravings and precise cuts. With features like Lightburn compatibility, air assist, and advanced components, the Monport 40W Laser provides excellent performance for both hobbyists and small businesses. By following the steps outlined above, you can ensure a smooth setup and get the most out of your Monport 40W Laser to take your engraving projects to new heights. Whether you’re just starting or looking to enhance your engraving capabilities, this machine is an invaluable tool for your creative endeavors.


