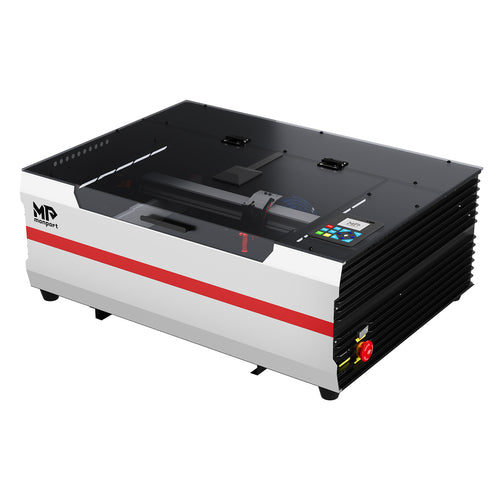
If you've been shopping for a desktop laser engraver, chances are acrylic is on your project list — it's one of the most popular materials for signage, keychains, home decor, and small-batch products because it cuts cleanly and can come out with a glass-like, polished edge. But not every machine handles acrylic the same way, and getting flame-polished results instead of melted, cloudy edges depends on understanding both your equipment and your settings. This guide walks through what a desktop laser engraver actually is, who it's built for, and exactly how to cut acrylic sheet so your edges come out crisp instead of scorched. Whether you're setting up your first machine or troubleshooting a project that isn't turning out right, you'll find practical answers below rather than just a sales pitch.

What Is a Desktop Laser Engraver, and Who Is It For?
A desktop laser engraver is a compact, self-contained laser system — usually CO2 or diode — that fits on a workbench or in a home studio rather than requiring a dedicated industrial space. Unlike large-format industrial lasers, desktop models are designed around accessibility: smaller footprint, simpler setup, and software that doesn't require an engineering background to learn.
That accessibility is exactly why desktop machines have become the entry point for so many different kinds of users:
- Hobbyists and makers who want to personalize gifts, ornaments, or craft pieces without renting shop space.
- Small business owners producing signage, engraved tumblers, or acrylic displays for local sale or Etsy shops.
- Designers and product developers prototyping parts or packaging before committing to a production run.
- Schools and makerspaces teaching digital fabrication, where safety features and ease of use matter as much as raw power.
Why Laser Power Matters More Than You'd Think
Wattage isn't just a spec on a box — it determines what materials, and what thicknesses, you can realistically work with. A lower-power diode machine might handle thin wood veneer or leather but struggle to cut acrylic cleanly at all. A CO2 desktop engraver in the 40W–65W range, by contrast, can cut and engrave a much wider range of materials, including thicker acrylic, in fewer passes. This is the main reason CO2 lasers dominate the acrylic-cutting conversation: their infrared wavelength is absorbed efficiently by acrylic, producing a clean melt-and-vaporize cut rather than a rough, chipped edge.
| Power Range | Example Monport Model | Typical Materials | Best Suited For |
| 5W–10W diode | Monport 6W Diode Laser | Thin wood, leather, coated metal (marking only) | Light engraving, budget hobby use |
| 40W CO2 | Monport 40W Pro (K40 Series) | Wood, thin-to-mid acrylic, rubber stamps | Hobbyists, students, light small-business use |
| 45W CO2 | Monport Reno45 | Wood, mid-thickness acrylic, leather | Small business production, signage, classrooms |
| 65W CO2 | Monport Reno65 | Wood, thick acrylic (up to 20mm in a single pass), leather, glass (engrave) | Higher-volume small business, detailed signage, production runs |
| 70W+ CO2 | Monport 70W MegaS | Dense acrylic, plywood, high-volume multi-material work | Commercial or production workloads |
For reference, the Monport Reno65 Desktop CO2 Laser Engraver is built for that mid-to-upper range: its 65W laser and premium reflective and focusing lenses can cut up to 20mm acrylic in a single pass, at engraving speeds up to 500mm/s across a 600 x 400mm (24" x 16") work area. Its magnetic assisted focus system speeds up setup by removing manual focus guesswork — which matters a lot for anyone cutting acrylic regularly, not just engraving. For a closer look at the full range of wattages and configurations currently available, browse Monport's desktop laser engraver collection.


How to Cut Acrylic Sheet With a CO2 Laser
Once you have the right machine, the actual process of cutting acrylic comes down to material prep, correct settings, and a few habits that prevent the most common mistakes. This walkthrough covers the fundamentals; for a deeper dive into material-specific settings, Monport's complete guide to laser cutting acrylic is a useful companion resource. Here's how to approach it step by step.
Step 1 — Choose the Right Acrylic
Not all acrylic sheet is created equal, and the type you buy directly affects your results:
- Cast acrylic is the standard choice for laser work. It cuts with a smooth, frosted edge and can be flame-polished to a glass-clear finish.
- Extruded acrylic is cheaper but tends to melt more and can leave a hazier, less refined edge — usable for prototypes, less ideal for finished retail pieces.
Always check whether the sheet has a protective paper or film backing; leaving it on during cutting reduces surface scorching and makes for easier cleanup afterward.

Step 2 — Set Up Air Assist and Ventilation
Acrylic cutting produces melted material and fumes, so air assist isn't optional — it blows debris away from the cut line in real time, which is what keeps edges clear instead of smoke-stained. Pair that with proper exhaust ventilation, since acrylic fumes should never be left to accumulate in an enclosed room.
Step 3 — Dial In Power and Speed
This is where most beginners either burn through material or fail to cut all the way through. As a general starting point on a 45W–65W CO2 desktop laser engraver:
| Acrylic Thickness | Approx. Speed | Approx. Power | Passes |
| 3mm | 15–20 mm/s | 70–80% | 1 |
| 5mm | 8–12 mm/s | 80–90% | 1 |
| 10mm | 5–8 mm/s | 90–100% | 1 |
| 15–20mm | 3–5 mm/s | 90–100% | 1–2 |
These numbers are a starting reference, not a fixed rule — always run a small test cut on scrap material first, since lens condition, focal distance, and even ambient temperature can shift the ideal settings slightly.

Step 4 — Keep Focus Consistent
A soft or blurry cut is often a focus problem, not a power problem. Machines with an assisted-focus system — like the magnetic assisted focus built into Monport's Reno Series — remove much of the guesswork here by making it fast to set the correct focal height, which matters a lot when you're switching between different acrylic thicknesses throughout a workday.
Step 5 — Let It Cool Before Handling
Freshly cut acrylic edges are still hot enough to warp or stick if pressed while cooling. Give pieces a minute before removing the protective film or stacking them.

Common Acrylic Cutting Mistakes to Avoid
-
Cutting speed mismatched to material thickness. Going too fast often results in an incomplete cut, forcing a second pass that can leave visible seam lines along the edge.
- Skipping the test cut. Acrylic behaves inconsistently from batch to batch, and cast sheets respond very differently than extruded ones. A quick test strip saves you from ruining a full piece.
- Neglecting lens cleanliness. A dirty or scratched lens scatters the beam. This softens the cut line and cuts into the power actually reaching the material.
- Poor ventilation. This isn't just a safety issue. Weak airflow allows soot to resettle on the acrylic surface, and once that happens, it's genuinely hard to clean off completely.
- Assuming every machine cuts the same way. Diode lasers and CO2 lasers interact with acrylic in fundamentally different ways. In fact, diode lasers generally aren't a good choice for cutting acrylic at all, since clear material absorbs the beam poorly and the fire risk goes up.

Choosing the Right Desktop Laser Engraver for Your Projects
If acrylic cutting is a regular part of your workflow, not just an occasional project, machine choice matters more than settings tweaks ever will. A few questions worth asking before you buy:
How thick is the material I'll typically cut? Thin acrylic (under 5mm) is forgiving on lower-powered machines like a 40W desktop CO2 laser. Once you're approaching 10 to 20mm, though, 45W to 65W of CO2 power becomes worth it, simply to avoid multiple slow passes.
How much workspace do I have? Desktop machines vary quite a bit in footprint and enclosed work area size. Monport's Reno Series alone spans a 16" x 12" bed on the Reno45 up to a 24" x 16" bed on the Reno65. It's worth measuring your typical project sizes against the bed dimensions before you commit to a model.
Do I need engraving, cutting, or both? Most CO2 desktop engravers handle both reasonably well, but double-check that the specific machine you're considering is actually rated for cutting and not just surface marking.
What software will I actually use? If you want flexibility beyond a manufacturer's proprietary software, LightBurn compatibility is worth prioritizing from the start.
For small business owners and makers who need to move between detailed engraving and cutting thicker acrylic in the same session, something in the 65W CO2 class, like the Monport Reno65, tends to strike a good balance between capability and desktop footprint, without the cost or space demands of an industrial-grade system. If you're just starting out or mostly working with thinner materials, the more compact Monport Reno45 or Monport 40W Pro may suit your budget and workspace better.

FAQs
What is the best laser for cutting acrylic sheet?
CO2 lasers are the standard choice for acrylic. Their wavelength is absorbed efficiently by the material, producing a clean, often flame-polished edge. Diode lasers generally struggle with clear or reflective acrylic and aren't recommended for cutting it.
Can a desktop laser engraver cut through thick acrylic?
It depends on wattage. A 40W desktop CO2 laser can typically handle thinner acrylic in a single pass, while a 65W-class machine like the Monport Reno65 can cut up to 20mm acrylic in a single pass thanks to higher power and premium focusing lenses.
Why does my acrylic edge look cloudy instead of clear?
Cloudy or hazy edges are usually caused by speed that's too fast for the power setting, extruded (rather than cast) acrylic, or a focus that's slightly off. Running a test cut on scrap material helps isolate which factor is at play.
Do I need air assist to cut acrylic?
Yes. Air assist clears melted debris and smoke from the cut path as you go, which directly improves edge clarity and reduces surface scorching.
Is a desktop laser engraver good for a small business?
Yes, for many product categories. Engraved and cut acrylic signage, tumblers, keychains, and displays are common small-batch products made on 40W–65W desktop CO2 machines, which offer enough power for regular production without requiring industrial space or ventilation setups.
Conclusion
Clean acrylic cuts come down to two things: a machine with the right power for the job, and settings that match your material rather than a one-size-fits-all guess. A 45W–65W CO2 desktop laser engraver gives most makers and small business owners enough headroom to cut mid-to-thick acrylic in a single pass while still handling detailed engraving work on the side — and once you understand how power, speed, and air assist interact, how to cut acrylic sheet cleanly becomes a repeatable process rather than trial and error. The right equipment won't do the thinking for you, but it does remove a lot of the guesswork that trips up beginners.
Ready to put this into practice? Explore the Monport Reno65 Desktop CO2 Laser Engraver and the rest of Monport's desktop lineup to find the machine that fits your projects, workspace, and budget — then start turning acrylic sheet, wood, and more into finished pieces with confidence. For more tutorials and project ideas, visit the Monport Laser blog. Use code BESTMP10 for 8% off your order when you're ready to get started.