If you ever dreamed of taking ordinary wood and transforming it into personalized keepsakes, stunning artwork, or even custom business products, then how to laser engrave wood using a Monport 80W CO2 laser laser engraving machine for home is a question you've likely pondered.
The wood laser engraving ideas are endless, as this technology allows you to permanently mark wood with intricate designs, personalized messages, or even stunning photographs, opening up a world of possibilities for hobbyists and aspiring entrepreneurs alike.
But before you unleash your inner laser maestro, it's crucial to understand the process. This beginner's guide will walk you through the essentials of how to laser engrave wood using a Monport 80W CO2 laser engraving machine for home, equipping you with the knowledge and confidence to embark on your creative journey, with the assistance of a reliable wood etching machine.
Monport 80W CO2 Laser Engraver & Cutter (28" x 20") with Autofocus and Bracket
Choosing Your Wood Laser Engraving Machine for Home
The first step is selecting the right wood etching machine for home. A Monport 80W CO2 laser engraving machine is a popular choice for beginners, offering a balance of power, workspace size, and affordability. This makes it ideal for tackling a variety of laser engraving ideas and creating intricate designs on wood with precision and ease. A wood etching machine in this range is a great starting point.

Here are some key factors to consider:
- Work area size: Ensure the machine's workspace accommodates the size of your wooden projects. Popular sizes include 300mm x 200mm and 400mm x 300mm.
- Laser power: Higher wattage generally translates to faster engraving and deeper cuts, but 80W is sufficient for most wood engraving projects.
- Features: Look for features like autofocus, air assist, and rotary attachments for added convenience and versatility.
- Software compatibility: Ensure the machine supports popular software like LightBurn or RDWorks for design creation and laser control.
How to laser engrave using a wood etching machine: Preparation stage
Not all wood is created equal for laser engraving. Here's how to prepare your wood for optimal results with your wood etching machine:

- Wood type: Choose woods with low resin content and tight grain patterns, such as birch, maple, basswood, or plywood. Avoid softwoods or woods with knots or cracks.
- Moisture content: Wood should be dry with a moisture content between 6-8% for best engraving results.
- Surface preparation: Sand the wood smooth to ensure even engraving. Pre-treating the wood with a laser masking spray may be helpful for some projects.
Ready to Turn Wood into Wow?
Unlock the full potential of your woodworking projects with the Monport 80W CO2 Laser Engraver — the perfect at-home solution for hobbyists, artists, and small business dreamers.
- Precision autofocus & air assist
- Compatible with LightBurn & RDWorks
- Spacious 28" x 20" work area with bracket for large-scale projects
-
Begin your engraving journey today — and save 10% with code: STARTWOOD10
Shop the Monport 80W Now
Designing Your Artwork with laser engraving machine for home

Now comes the fun part – creating your design! You can use various graphic design software or choose from pre-made templates. Keep these tips in mind:
- Vector graphics: Convert your artwork to vector format (.ai, .dxf, .svg) for precise engraving.
- Resolution: Use high-resolution images to avoid pixelation.
- Simple vs. complex: Start with simple designs if you're new to laser engraving. Increase complexity as you gain experience.
How to laser engrave wood: Step-by-Step
With everything prepared, it's time to laser engrave wood! Here's a simplified overview:
- Import your design: Upload your artwork into your laser engraving machine for home software.
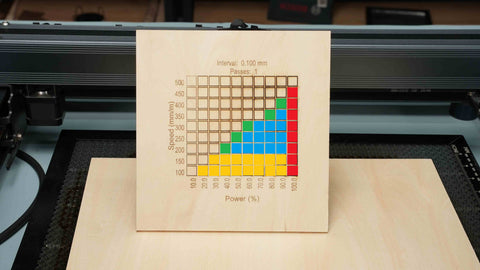
- Set parameters: Adjust settings like power, speed, and resolution based on your wood type, desired engraving depth, and machine specifications. Refer to your laser engraving machine for home manual for recommended settings.
- Test engraving: Perform a test engraving on scrap wood to fine-tune your settings before proceeding with your laser engraving machine for home project.
- Mount your wood: Securely mount your wood piece in the laser bed, ensuring it's level and centered for even engraving.
- Start engraving: Once satisfied with your test, initiate the engraving process and watch your design come to life!
- Cleaning: After engraving, gently remove any masking material and clean your wood with soap and water. Avoid abrasive cleaners or scrubbing.

Tips and Tricks: Using Wood Laser Engraving Machine for home

- Experiment with different settings: Test various power and speed combinations to achieve the desired depth and detail.
- Use high-quality wood: Higher quality wood generally produces cleaner and more consistent engraving results.
- Maintain your laser engraving machine for home: Regularly clean your laser lens and mirrors to ensure optimal performance and engraving quality.
- Join the community: Online forums and communities offer a wealth of resources, inspiration, and troubleshooting tips from fellow laser enthusiasts.
Read More: How to Use DIY Wood Engraving to Create Custom Wood Gifts for Dad
Conclusion
With a little practice and the right laser engraving machine for home, wood laser engraving can open doors to a world of creative possibilities. Remember, the journey is just as important as the destination. So, embrace the learning process, experiment with different laser engraving ideas, and have fun transforming ordinary wood into extraordinary creations with your laser engraving machine! The potential is limitless when you combine creativity with the precision of a wood etching machine.
Why just dream it when you can engrave it? Whether you're crafting heartfelt gifts, custom signage, or launching your own laser business, the Monport 80W CO2 Laser Engraving Machine gives you the precision and flexibility to make it happen.
Start Creating with Confidence
Why just dream it when you can engrave it? Whether you're crafting heartfelt gifts, custom signage, or launching your own laser business, the Monport 80W CO2 Laser Engraving Machine gives you the precision and flexibility to make it happen.
- Beginner-friendly yet powerful
- Built for wood, acrylic, leather, and more
- Safety features + pro-level performance at home


