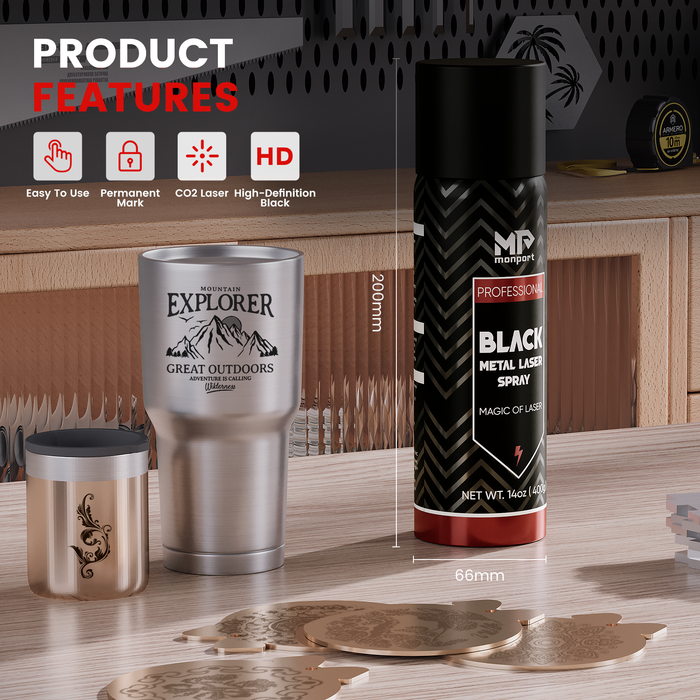
The holiday season is the perfect time to get creative and make unique decorations for your home. One of the best tools for crafting beautiful DIY Christmas decorations is the K40 laser engraver.With its precision and versatility, you can create everything from ornaments to holiday signs using black laser marking spray. In this guide, we’ll explore how to use the Monport 40W Lightburn-ready CO2 Laser Engraver & Cutter, available at price cutters, to craft stunning holiday pieces.


What is a K40 Laser Cutter?
The K40 laser engraver is a compact and powerful machine that uses a CO2 laser to cut and engrave various materials. This 40W model is perfect for DIY projects because it can handle materials like wood, acrylic, and leather. Its compact size makes it suitable for home use, and with the right settings, you can achieve professional-quality results. It's especially great for creating Christmas decorations laser designs such as intricate snowflakes, personalized ornaments, and festive signage.
Key Features of the Monport 40W Laser Engraver
| Feature | Description |
|---|---|
| Power | 40W CO2 laser for precise cutting and engraving |
| Work Area | 12" x 8" work area for various projects |
| Lightburn-ready | Compatible with Lightburn software |
| Versatile Materials | Works with wood, acrylic, leather, and glass |
Getting Started with Your K40 Laser Engraver
Before diving into your DIY Christmas decorations laser projects, it’s essential to set up your K40 laser engraver correctly. Follow these steps to ensure everything is ready for your creations:
-
Unbox and Assemble: Carefully unbox your Monport 40W laser engraver and assemble it according to the manufacturer’s instructions.
-
Software Installation: Install Lightburn software on your computer. This program allows you to design and control your laser engraver.
-
Material Preparation: Choose your materials for the decorations. Popular choices include plywood, acrylic sheets, and cardstock.
-
Design Your Projects: Create designs for your Christmas decorations in Lightburn. You can use pre-made templates or create your own.

Ideas for DIY Christmas Decorations
Here are some fun ideas for using your K40 laser cutter to create unique decorations for the holidays:
1. Customized Ornaments
Using your laser engraver, you can create personalized Christmas ornaments for your tree. Consider using thin wood or acrylic to cut out shapes like stars, snowflakes, or holiday characters.
Materials Needed:
- Thin wood or acrylic sheets
- Lightburn software for design
- Hooks for hanging
2. Holiday Signs
Craft beautiful signs to display around your home or yard. Use the laser engraver to engrave festive messages like “Merry Christmas” or “Happy Holidays” on wooden boards.

Materials Needed:
- Plywood or MDF boards
- Paint or stain for finishing
3. Gift Tags
Make your gifts extra special by creating custom gift tags. You can engrave names or messages on wooden or acrylic tags for a personal touch.

Materials Needed:
- Small pieces of wood or acrylic
- Ribbon or string for attaching to gifts
4. Table Centerpieces
Design stunning table centerpieces for your holiday meals. You can create layered designs using different materials to make eye-catching decorations.

Materials Needed:
- Various materials (wood, acrylic, etc.)
- Glue or adhesive for assembly

Safety Tips for Using Your K40 Laser Engraver
When working with a laser engraver, safety should always be a priority. Here are some important safety tips:
- Wear Protective Gear: Use safety goggles to protect your eyes from laser light.
- Ventilation: Ensure your workspace is well-ventilated to avoid inhaling fumes produced during engraving.
- Supervise the Machine: Never leave the laser engraver unattended while it’s in operation.

FAQs About Using a K40 Laser Engraver for DIY Christmas Decorations
Q1: What types of materials can I use for my decorations?
A: You can use wood, acrylic, leather, cardstock, and even some metals, depending on the power of your laser engraver.
Q2: Can I use designs from the internet?
A: Yes! Many websites offer free or paid designs suitable for laser engraving. Just make sure to adjust the size to fit your materials.
Q3: How do I maintain my K40 laser engraver?
A: Regularly clean the lenses and mirrors, check for any loose connections, and keep the workspace clear of debris.
Q4: How long does it take to create a decoration?
A: It depends on the complexity of the design and the material used. Simple projects can take just a few minutes, while intricate designs may take longer. If you're using equipment like the Monport 40W or K40 laser cutter, available at price cutters, the cutting and engraving speed will also vary based on settings and the material being used.
 Important Details to Remember
- Power Settings: Always test your settings on scrap material to avoid wasting your primary materials.
- File Formats: Lightburn supports various file formats, including SVG, DXF, and JPG. Choose the format that best suits your design.
- Calibration: Regularly calibrate your laser engraver to ensure precision in your cuts and engravings.

Takeaways
-
The K40 laser engraver is a versatile tool for creating DIY Christmas decorations laser projects.
-
Planning and preparation are essential for successful designs.
-
Always prioritize safety when using a laser engraver.
-
Experiment with different materials and holiday-themed ideas to make your decorations stand out.

Conclusion
Creating DIY Christmas decorations laser projects with a K40 laser cutter is a fun and rewarding way to add a personal touch to your holiday decor using black laser marking spray. With the Monport 40W Lightburn-ready CO2 Laser Engraver, available at price cutters, you have the tools needed to bring your creative visions to life. Gather your materials, plan your designs, and enjoy the process of crafting beautiful holiday decorations that you and your loved ones will cherish for years to come!