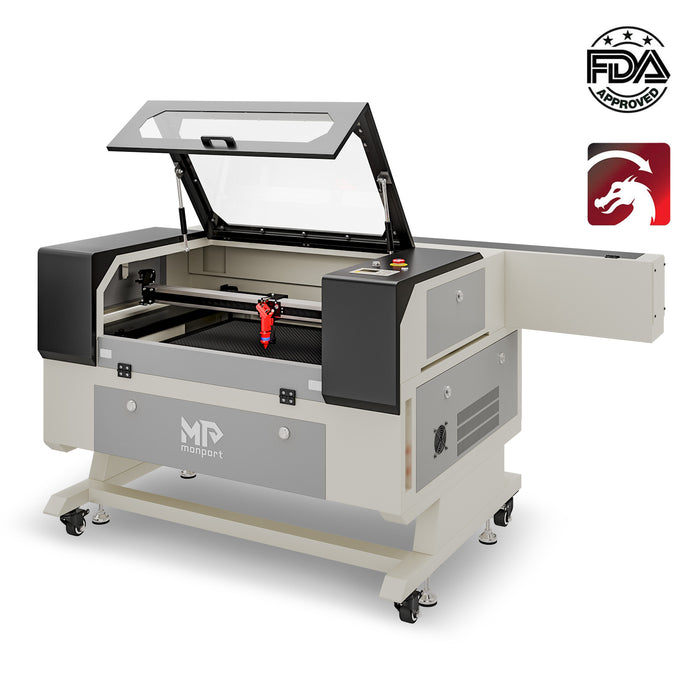
Are you on a quest to find the ideal laser engraving machine for your hobby or business? Look no further! In this comprehensive guide, we will delve into all the features and detailed descriptions of Monport's 100W CO2 Laser Engraver & Cutter. Whether you're a beginner or someone struggling to operate this powerful tool, this article is designed to help and inform you. Let's embark on this exciting journey together!
Introducing Monport's 100W CO2 Laser Engraver & Cutter

Are you ready to take your engraving projects to the next level? Monport's 100W CO2 Laser Engraver & Cutter is the perfect choice for those seeking a high-performance machine to bring their creative visions to life. With its advanced features and impressive capabilities, this laser engraver is the tool you've been searching for. Let's explore all the unique features and benefits it offers.
Spacious Work Bed for Large Projects

With a generous 20" x 28" work bed, Monport's 100W CO2 Laser Engraver & Cutter is specifically designed for big projects. Whether you're working on large signs, intricate woodwork, or personalized home decor, this machine provides ample space to accommodate your creative ideas. Plus, it features a four-way pass-through for items that extend beyond the workbed, giving you the freedom to work on larger and bulkier objects.
Double Protection and Stability
When it comes to laser engraving, stability and safety are paramount. Monport understands this, which is why they have equipped their 100W CO2 Laser Engraver & Cutter with high-quality materials to provide double protection. The machine features a metal honeycomb board and aluminum panel, ensuring a secure and stable environment for your workpieces. Additionally, the machine is moveable, allowing you to work with thicker materials while maintaining stability.
Great Compatibility for Versatile Usage
Monport's 100W CO2 Laser Engraver & Cutter is compatible with both Windows and Mac operating systems, making it accessible to a wide range of users. Whether you prefer RDWorks or LightBurn software, this machine supports both, giving you more flexibility and control over your engraving projects. Enjoy precise control and achieve detailed engravings on various non-metallic surfaces, including wood, glass, acrylic, and leather, with a depth of up to 0.59". The machine can reach speeds of up to 800mm/s, allowing you to work efficiently without compromising on quality.
How to Use Monport's 100W CO2 Laser Engraver & Cutter: A Step-by-Step Guide
Now that you're familiar with the exceptional features of Monport's 100W CO2 Laser Engraver & Cutter, let's dive into a step-by-step guide on how to use this machine effectively:
Step 1: Set Up Your Workspace

Start by creating a dedicated workspace for your laser engraving machine. Ensure that the area is well-ventilated and free from any flammable materials. Set up the machine on a sturdy surface and connect it to a reliable power source.
Step 2: Prepare Your Design

Using compatible software (such as RDWorks or LightBurn), create or import the design you want to engrave. Experiment with different settings to achieve the desired depth and speed for your project. Remember to use vectors for cutting and raster images for engraving.
Step 3: Prepare Your Material

Choose the appropriate material for your engraving project, ensuring that it is compatible with the laser engraver. Securely position the material on the work bed, making sure it is flat and level. If necessary, use clamps or adhesive tape to hold it in place.
Step 4: Calibrate the Machine
Before starting the engraving process, calibrate the machine to ensure accurate results. Follow the manufacturer's instructions to align the laser beam and focus it properly. This step is crucial for achieving precise and detailed engravings.
Step 5: Start Engraving
Once the machine is calibrated, it's time to start the engraving process. Double-check all settings, safety measures, and the position of your material. Press the start button on the control panel, and the machine will begin engraving your design onto the material. Monitor the process closely to ensure everything is going according to plan.
Step 6: Finishing Touches

After the engraving is complete, remove the material from the machine and inspect the results. If necessary, clean the engraved surface and make any final adjustments or refinements to enhance the overall appearance. Your masterpiece is now ready to be displayed or used for its intended purpose.
Conclusion: Discover the Power of Monport's 100W CO2 Laser Engraver & Cutter
Monport's 100W CO2 Laser Engraver & Cutter is a versatile and powerful tool that can elevate your engraving projects to new heights. With its spacious work bed, double protection, compatibility with popular software, and exceptional performance, this machine is a game-changer for both beginners and experienced users. Visit Monport's website today to explore their range of laser engraving machines and take advantage of their best deals. Unleash your creativity, and let Monport's 100W CO2 Laser Engraver & Cutter bring your visions to life!
Ready to Transform Your Ideas Into Precision-Crafted Creations?
The Monport 100W CO2 Laser Engraver & Cutter isn’t just a tool — it’s your new creative partner. Whether you're crafting custom decor or launching a small business, this machine delivers speed, precision, and professional-grade results.
- Spacious 20" x 28" work bed
- Compatible with RDWorks & LightBurn
- Engraves wood, acrylic, glass, leather & more
- Built-in Autofocus & double-layered protection
Don't wait — visit Monport now and start engraving like a pro.
Explore Monport’s Laser Engravers →
Unlock Big Savings at Monport Laser! Use code BESTMP10 at checkout for an exclusive discount – Click here to shop now!


