


MONPORT ONYX 55W Desktop CO2 Laser Engraver with Autofocus

How do you avoid laser burning laser marks when laser cutting?

Pay attention to the choice of wood
Cork: Softwood, such as balsa and alder, requires lower power Settings and higher laser speeds to avoid laser burning laser marks. Cork does not require much power and laser interaction for long periods of time. Using lighter wood minimizes the contrast between the original surface and the newly cut edge.
Hardwoods: Hardwoods like cherry and oak burn more easily than light woods because you'll need to use a more powerful laser to carve or cut the surface. The result is darker edges and a greater likelihood of laser burning laser marks.
Plywood: Plywood is a more difficult substrate to cut without burning, although it is possible if you use the tips below. It is one of the most versatile materials available in a variety of sizes and styles. However, you will need to choose one specifically designed for laser cutting, such as birch plywood. For plywood this special wood, also need to test speed and power in advance. Edge burns are one of the most common challenges in laser-cut plywood, and the cutting power and speed of the engraving machine must be increased as much as possible to reduce the residence time of the laser on the material and minimize the burn on the cutting edge. This is due to edge laser burning laser marks, usually due to high laser power or low cutting speed.
The wavelength: Even the laser wavelength will affect the cutting edge of the material, so 1.06 micron fiber laser is not recommended. In contrast, fiber bundles of 9.3 or 10.6 microns produced the fewest burn marks when cutting wood with carbon dioxide lasers.
Resin content: When using a laser cutter, the amount of SAP or resin in the wood can make a huge difference. Materials like alder with a high resin content are more likely to burn or have dark edges, while oak has a lower resin content and is better suited for light and clean cuts. The degree of burn marks will vary from material to material, and wood with a high resin content or a low water content is more likely to show burn marks. But if you do need a specific type of wood with a high resin content, there are other effective methods you can use to make the wood without laser burning laser marks sticking out.
Appropriate sculpting power and speed
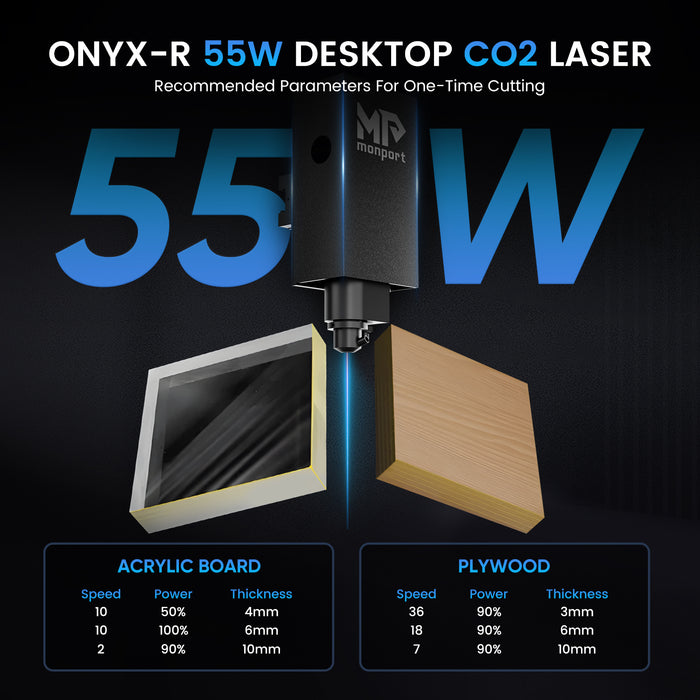
Improper power and speed adjustment can result in uneven or poor-quality engravings. Therefore, it is a good idea to perform a power-speed test before sculpting any object using lazer engraving machines. It will give you a better idea of what kind of power and speed you need to choose. For different types of wood materials, there is no problem with adjusting the optimal distance of the laser focus. Experiment with different focal length settings to see what works best. Monport 60W, 80W, 100W, 130W, and 150W lazer engraving machines are equipped with an autofocus system, eliminating the need to manually adjust the optimal distance to focus the laser. Experiment with different focal length settings to see what works best. In summary, reducing the power and increasing the speed usually reduces the burn area. Once you've found a setting that works for each type of wood, you can jot it down to speed up future progress. You can also manually adjust the laser focus to make it slightly smaller to find the perfect cutting settings.
Use masking tape
You can attach masking tape to wood surfaces, and application tape is readily available in wide rolls that work perfectly with lazer engraving machines. You can apply the tape to the sides of the product for a perfectly clean surface. Use a small plastic scraper to firmly press down on the tape to ensure there are no air bubbles, which may affect the cutting process. The tape will show burn marks, while the wood will remain safe. This is the most cost-effective solution, but it will not prevent the burn marks that appear on the edges of wood when laser cutting is used. Not only is tape inexpensive and handy, but it can also be easily removed without leaving any marks on your work.
Use honeycomb panels
If there are burn marks on the back of the wood, it may be because of the surface or bed under the laser machine. When a laser machine is carving or cutting an object, smoke flows through the bottom of the object. It causes visible burn marks. Therefore, a suitable panel is needed to provide optimal ventilation and easy passage of smoke. Usually equipped with honeycomb panels to indicate that the cutting space is not closed, can increase the speed of air flow, because the laser generated heat is deposited downward, this honeycomb panel below the carved area heat or smoke heat can also be lost.
Air assist system
Air assistance doesn't necessarily completely eliminate the risk of a carbon dioxide laser burning wood, but it can help in any case. It can be very effective for some users. Air assistance is especially beneficial for wood carving jobs using lazer engraving machines equipped with an air purifier. The air assistance creates a strong airflow that helps remove debris and smoke from the surface while also cooling the material's surface. This results in cleaner engravings and minimizes the chances of burning the wood.
Elevate Your Engraving with Monport Black Laser Marking Spray
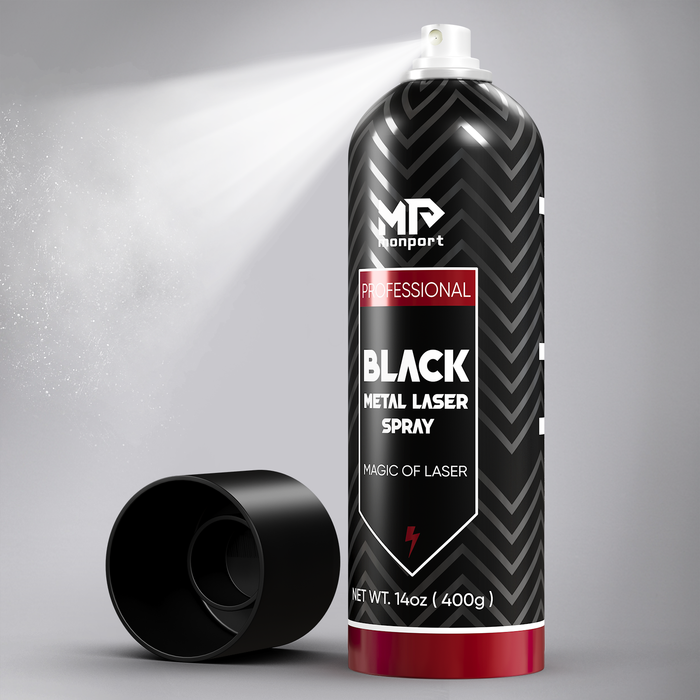
Monport black laser marking spray is an essential tool for those looking to create permanent, high-contrast markings on a variety of metals, including aluminum, stainless steel, and brass. Ideal for use with CO2 laser engraving machines of 25 watts and above, this black laser marking spray ensures deep, durable marks that withstand the test of time. With its advanced nozzle technology, the spray is applied evenly, allowing for a smooth, professional finish every time. The quick-dry formula of this black laser marking spray helps streamline your workflow by drying in just five minutes, enabling faster production. After engraving, simply rinse the surface to reveal the sharp, dark markings created by the black laser marking spray, making it perfect for a wide range of applications from custom jewelry to industrial tool marking.


